 |
|
| |
| T H E S P A C
E |
The minimum active space required
is 7.5 meters by 7.5 meters by 3.5 meters high,
or, 25 feet by 25 feet by 12 feet high. The major
consideration in terms of space is the total avoidance
of ambient light. The space should be painted
a non-reflective black and no light source should
exist, other than the one that emanates from monitors
themselves. Also include a low bench seating four
or five people. The entrance must be well insulated
from light and sound. Most ideal is a double trap
door with sound insulating material. (See floor
plan and entrance diagrams.)
NOTE: The tech equipment except the monitors and
speakers should be located outside the exhibition
space in a small adjacent tech area. |
|
| |
| E Q U I P M E
N T |
| The Vasulkas can provide
all the equipment listed below, or share resources
with the exhibitor. This will be reflected in
both shipping and equipment budgets. |
| |
15 or 18 matching video monitors
3 Pioneer Video Laser Disk Players, LD-V Series
3 program video laser disks NTSC, color
1 three channel synchronizer
3 stereo audio amplifiers (6 audio channels)
6 speakers (internal speakers of superior quality
may be used)
6 speakers stands or wall mounts
15 video cables
3 pairs of stereo cables
4 speaker cables
22 power outlets
1 circular rug (optional) |
| NOTE: The laser disk
synchronizer used by the Vasulkas is custom built
and interfaces only with Pioneer Industrial Laser
Disk Players (2200 to 8000 Series). It is not
interchangeable with laser disk players from other
manufacturers, such as Sony and Phillips, which
require a commercially available synchronizing. |
|
|
|
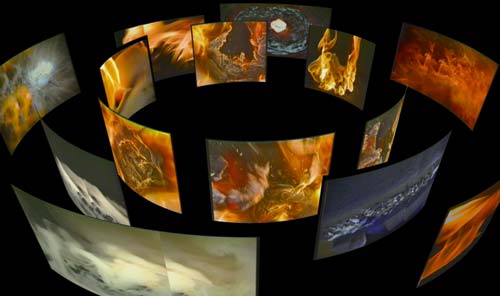
| M O N I T O R S |
| The fifteen (or eighteen) monitors
must be matching in size and manufacture. They
are placed on the floor in a circle facing inward
without spacing in between, tilted about 30 degrees
upwards. Some monitor models are designed to make
this easy; with others, wedges must be built to
be put under the monitors to tilt them upwards
from the floor. These wedges must be custom-made
(one for each) to fit the size and shape of the
monitors. |
|
|
|
V I D E O M A
T R I X A S S E M B L Y A
N D
W I R I N G |
Place a circular rug (provided along
with the other installation equipment) in the
middle of the room. The rug provides a convenient
way to establish a center around which the monitors
can be placed in an approximate circle. An alternate
method is to draw an erasable circle on the floor.
First connect the players
to the monitors (see drawings). Channel one connects
to the first on the line, skips the next two,
connecting to the fourth, seventh, etc. Channel
two connects to the second, fifth, eight monitors,
etc. Channel three connects to the third, sixth,
ninth, etc., monitors in the circle. If the monitor
speakers are of very good quality, the audio can
be chained the same way as the video (six discreet
audio channels), so the sound emanates from each
monitor in equal intensity.
After
verifying that all audio and video cabling is
working, lift the front of each monitor one-by-one
about 30 degrees up to place the pre-fabricated
wedges underneath. Now push the monitors toward
the middle, an equal distance from the edge of
the rug, so that the front edges of the monitors
touch. Once the circle is perfect, all the cables
should be tucked under the monitors and tied down.
Finally, remove the rug or erase the drawn circle. |
|
|
|
| A U D I O W I
R I N G |
| Connect the two stereo cables from
each player to the three amplifiers, and the six
speaker cables to the speakers. The speakers should
be hung on the walls at equal distances. |
|
|
|
| S O U N D A N
D I M A G E A D J U S
T M E N T |
| Treble should be normal and bass
at maximum. All 75 ohm terminators located on
the back of the monitors must be switched to open,
except for the last monitor on each chain. Contrast
should be high and brightness below middle. The
basic rule here is to set up the proper deep color
black as a reference to the maximum contrast and
brightness. With that, the other components (hue,
color saturation) can be assigned. The persons
installing the environment must use their esthetic
judgment as to the proper monitor settings for
maximum visual impact. |
|
|
|
| D A I L Y O P
E R A T I O N S |
TO START:
Power up the monitors, disk players, and synchronizer.
Wait a short while to verify that the installation
is starting synchronously. If not, turn power
off and on again for the players and synchronizer.
If problem persists, notify Steina by phone, fax,
or e-mail. TO SHUT DOWN:
Turn power off the monitors, disk players and
synchronizer.
MAINTENANCE:
The monitor screens need to be cleaned with
a soft cloth at least once a week. |
|
|
|
| P O W E R R
E Q U I R E M E N T S |
| |
(depending
on equipment used)
Video monitors:
Stereo amplifiers:
Video disk players:
Synchronizer: |
Sony PVM 1910
Pioneer 2200
Pioneer 8000
Jericho Data Systems |
120 watts
150 watts
70 watts
100 watts
40 watts |
|
| Outside USA, use a Power
Transformer 220 to 110, 1000w. |
|
|
|
| C R E D I T S |
At the entrance to the installation
these credits should appear:
“Pyroglyphs
by Steina in close collaboration with Tom Joyce.” |
|
|
|
| S H I P P I N G
I N F O R M A T I O N |
| Installation is shipped in one crate.
Weight and dimensions available upon request. |
|
|
|
|
|
|
|
|
|
| |
|
|